Blog
Technical writing on backend systems, AI products, developer tooling, and engineering decisions.

Claude Code Dynamic Workflows: From One Prompt to Your Own AI Team
Claude Code Dynamic Workflows: From One Prompt to Your Own AI Team How Claude Code’s Dynamic Workflows move AI-assisted development from single-answer generation to process design Executive summary Dynamic Workflows allow Claude Code to break complex work into smaller tasks, distribute those tasks across subagents, verify the results, and synthesize a final answer. The result is less like a single coding assistant and more like a task-specific AI teamDynamic Workflows allow Claude Code to break complex work into smaller tasks, distribute those tasks across subagents, verify the results, and synthesize a final answer. The result is less like a single coding assistant and more like a task-specific AI team. Introduction: AI is no longer just answering AI coding tools have long promised to help developers write code faster. First came autocomplete. Then came chat-based coding assistants. More recently, tools moved directly into the terminal, where they can read files, edit code, run commands, and reason across a project. Claude Code’s Dynamic Workflows represent a more interesting shift. The point is not simply that Claude can open a file and write code. The point is that Claude can analyze a large task, split it into smaller jobs, assign those jobs to separate agents, verify the outputs, and then synthesize everything into a clean final result. In other words, we are no longer talking about one AI assistant responding to one prompt. We are talking about a temporary, task-specific AI team assembled on demand. That is why Dynamic Workflows feel less like a minor feature update and more like a change in how agentic coding work is organized What is a Dynamic Workflow? A Dynamic Workflow is a task-specific execution structure created inside Claude Code. Instead of keeping the entire plan inside a single chat context, Claude can create a workflow script that defines how the work should be broken down, which subagents should run, how intermediate results should be stored, and how the final answer should be produced. In a normal Claude Code session, the model thinks, calls tools, edits files, and replies within the same conversation flow. That works well for small and medium-sized tasks. But as the task grows, context becomes noisy, the goal can drift, and the model may fail to challenge its own output hard enough. Dynamic Workflows reduce that problem by turning the plan into an executable structure. Each subtask can run in a narrower context, while the main conversation stays cleaner and less overloaded with irrelevant intermediate detail. Why one agent is not always enough For large software tasks, a single agent may look sufficient at first. In practice, long tasks create predictable failure modes. The model may lose track of constraints, skip edge cases, or present partial progress as if the full job were done. Three risks are especially important. The first is agentic laziness: the model does part of a large task and then behaves as if it completed all of it. The second is self-preferential bias: the model tends to judge its own solution too kindly. The third is goal drift: over a long task, the original objective slowly shifts or important constraints disappear from attention. Dynamic Workflows help reduce these risks by splitting the job into specialized roles. One agent can generate, another can verify, a third can look for false positives, and a final synthesizer can turn the results into a readable report. Per-agent isolation: every agent gets a clean workspace One of the most useful ideas behind Dynamic Workflows is per-agent isolation. Each agent can work in its own narrower context instead of sharing one crowded conversation. This is valuable when analyzing large repositories, where unrelated details can easily contaminate the reasoning process. For example, imagine a project-wide authentication and authorization review. One agent can extract all endpoints. Another can inspect whether authentication checks exist. Another can focus on input validation. Another can verify risky findings. A final agent can remove false positives and produce the final report. This does not merely make Claude do more work. It makes Claude organize the work into smaller areas of expertise. The 6 core Dynamic Workflow patterns A practical way to understand Dynamic Workflows is through six repeatable patterns. These patterns turn Claude Code from a coding assistant into a system that can design and run different kinds of work processes. Classify-and-Act In this pattern, one agent first classifies the incoming task. Based on that classification, the workflow chooses the right next action or routes the job to the right specialist agent. A bug report, for example, can be classified as frontend, backend, security, or performance before the workflow decides what should happen next. Fan-out-and-Synthesize A large job is split into many smaller pieces. Each piece is handled by a separate agent, and a synthesis step merges the findings into one coherent result. This is one of the most useful patterns for repository-wide scans and large codebase analysis. Adversarial Verification The goal here is not just to produce an answer, but to challenge it. One agent creates a solution; another agent tries to find flaws, missing evidence, or risky assumptions. This pattern is especially valuable for security, finance, release validation, and technical report review. Generate-and-Filter The workflow first creates a broad pool of options, then filters them against explicit criteria. It is useful for naming, product messaging, CLI design, title generation, and any creative task where quantity must be followed by quality control. Tournament Several agents solve the same problem in different ways. Their solutions are compared, and the strongest approach is selected. This is helpful when there is no single obvious answer, such as architecture decisions, UI tradeoffs, or refactor planning. Loop Until Done Some tasks do not have a known number of steps. This pattern keeps running until a stopping condition is met: tests pass, no new issues are found, or a quality threshold is satisfied. 14-step practical checklist The best results usually come from giving Claude Code a clear frame. This checklist turns Dynamic Workflows into something practical rather than theoretical. Example prompt This prompt does more than ask Claude to ‘check the project.’ It explains how the work should be split, verified, filtered, and reported. Create a dynamic workflow to audit this project for authentication and authorization issues. Split the work like this: 1. Extract all endpoints. 2. Check whether each endpoint has authentication protection. 3. Look for missing input validation. 4. Send risky findings to a separate verifier agent. 5. Remove likely false positives. 6. Report the final results with severity, file path, evidence, and suggested fix. Limit the first pass to backend/src. Keep the output short, evidence-based, and token-efficient. When should you use Dynamic Workflows? Dynamic Workflows are not necessary for every task. If you need a small function, a one-file edit, or a quick explanation of an error message, a normal Claude Code session is usually faster and cheaper. But if the task is large, repetitive, easy to parallelize, or expensive to get wrong, workflows start to make sense. Good use cases include repository-wide scans, multi-file refactors, framework migrations, security reviews, test-fixing loops, research synthesis, and technical report verification If a task overloads one context window, requires independent verification, or naturally splits into parallel subtasks, it is a good candidate for a Dynamic Workflow. Ultracode and the cost question Settings such as ultracode can make Claude Code more willing to plan and run complex workflows. The tradeoff is cost. More reasoning, more agents, and more tool calls usually mean more token usage. That is why Dynamic Workflows should not be treated as a magic mode to turn on for everything. The smarter approach is to start with a small scope, see whether the workflow creates real value, and then save the successful pattern for reuse. The real shift: from writing code to designing process The most important thing about Dynamic Workflows is that they move AI use from answer generation to process design. In the old pattern, a prompt might say: ‘Fix this bug.’ In the new pattern, a prompt can say: ‘Use a workflow to inspect this module for auth issues, split endpoints across agents, verify the findings, and report only evidence-backed results.’ Those two prompts are fundamentally different. The first asks for an output. The second asks for a process that produces, checks, and synthesizes the output. In the future, strong developers will not just be people who ask AI to write code. They will be people who can decompose work, define verification criteria, design agent roles, and evaluate the final result. Conclusion Claude Code Dynamic Workflows represent an important shift in AI-assisted software development. They make it possible to use AI not as one assistant, but as a temporary team of specialized agents working toward a shared goal. Of course, workflows are not always the right choice. Used carelessly, they can increase token cost and make simple work unnecessarily complex. But when used well, they can significantly improve large refactors, codebase analysis, security reviews, migrations, and deep research tasks. The lesson is simple: in the AI era, the key skill is not just writing better prompts. It is learning how to split the right work into the right agent architecture. Main idea The advantage in the AI era will not come from writing the longest prompt. It will come from teaching AI to run the right process. Tags: #Anthropic #Claude #ClaudeAI #ClaudeCode #ClaudeCowork #ArtificialIntelligence #GenAI #Productivity #Automation #SoftwareDevelopment #TechTrends #DevTools #FutureOfWork #NoCode #LLM 📧 Subscribe for more AI development insights | 👏 Clap if this helped you | 💬 Share your ClaudeCode experiences in the comments
- Published on

The Axios npm Compromise Is a Warning to Every JavaScript Team⚠️
On March 31, 2026 , the JavaScript ecosystem got a brutal reminder that trust in open source is not the same thing as security. Two malicious Axios releases — [email protected] and [email protected] — were published to npm after what multiple security reports describe as a compromised maintainer account . Those releases pulled in a hidden dependency, [email protected] , which researchers say used install-time execution to deliver a cross-platform remote access trojan affecting macOS, Windows, and Linux . Axios is not some obscure package buried deep in a niche toolchain. It is one of the most widely used HTTP clients in the JavaScript ecosystem, with security vendors describing its reach in the hundreds of millions of downloads and use across frontend apps, backend services, automation, and CI/CD environments. That scale is exactly why this incident matters so much. What makes this incident so dangerous is that the malicious releases did not need to visibly rewrite Axios itself in an obvious way. Security analyses say the attacker introduced a fake dependency that existed primarily to execute during installation. In other words, the most dangerous code in the stack may have run before the application ever started . That changes the conversation completely. This is not just a dependency hygiene problem. It is not just a versioning mistake. It is a software supply chain incident with potential consequences for developer machines, CI runners, build agents, secrets, and release pipelines . If a poisoned package executes during install, the risk is no longer theoretical. It becomes an infrastructure and identity problem. What actually happened Public reporting from Wiz, Snyk, StepSecurity, and others points to the same core timeline. An attacker allegedly gained access to an Axios maintainer’s npm publishing account, then published [email protected] and [email protected] within a short window. Both releases introduced [email protected] , a malicious package used to execute a dropper chain. Snyk reports the malicious Axios releases were removed by 03:29 UTC on March 31, 2026, but any environment that installed them during that window may still have been exposed. Several analyses also highlight an important red flag: the malicious npm publishes did not appear to follow Axios’s normal release path. Some defenders noted a mismatch between what appeared on npm and what was reflected in the project’s usual source-controlled release flow. That kind of registry-versus-source inconsistency is exactly the sort of signal teams need to start monitoring much more aggressively Why this should worry every JavaScript team Most teams still think package risk means outdated dependencies or known CVEs. But incidents like this expose a much more uncomfortable truth: a trusted package can become malicious without changing your trust habits at all . Nobody had to install a typosquatted package. Nobody had to ignore a suspicious repo nobody had heard of. Teams only had to do something completely normal: resolve a dependency and run an install. That is what makes supply chain attacks so effective. They weaponize ordinary behavior. And in modern JavaScript environments, installs happen constantly: in local development, in CI, in Docker builds, in preview environments, in ephemeral runners, and in monorepo workflows that propagate updates quickly. A poisoned release can spread faster than most engineering organizations can investigate it. What you should do right now If your organization uses Axios anywhere, the right response is not panic. It is disciplined containment. First , determine whether you ever pulled the affected versions. Specifically, check for [email protected] , [email protected] , and [email protected] . Do not stop at package.json. Review lockfiles, dependency caches, CI logs, artifact metadata, and container build history. Security guidance from vendors covering the incident consistently points to those versions as the critical indicators to investigate. Second , if the malicious versions were actually installed on a workstation, CI runner, or build host, treat that system as a possible compromise , not merely as a project with a bad dependency. Multiple analyses describe the payload as a cross-platform RAT delivered through install-time behavior, which means environment secrets and host integrity are part of the incident scope. Third , rotate credentials aggressively. That includes npm tokens, GitHub tokens, cloud keys, SSH keys, deployment secrets, and any .env values that may have been present in affected environments. In supply chain incidents, dependency compromise often becomes identity compromise. Fourth , rebuild from a known-good state. Removing a package is not enough if malicious code may already have executed. Clean images, fresh runners, and trusted baselines are safer than trying to “clean up” an environment that may already have been altered. Vercel’s own response emphasized remediation actions immediately after the incident was discovered. Finally , use this incident to harden the next release cycle. Teams should consider tighter version pinning for critical packages, stronger scrutiny of lifecycle scripts, better separation of build secrets, stronger provenance checks, and alerting on unusual publish behavior or registry/source mismatches. These are not theoretical improvements anymore. This attack showed why they matter. Final takeaway The Axios npm compromise is not just a story about one poisoned package. It is a warning to every engineering team that still treats dependency installation as a routine action with routine risk. A patch release can now become an incident. A normal install can now become initial access. A dependency event can now become a credential event. That is the real lesson: If your team builds with npm, this is the moment to review how you handle dependency trust, install-time execution, release provenance, lockfile drift, and build secrets. Because the next supply chain incident will probably not come from a package nobody trusts. It will come from one that everybody already does Sources and further reading Socket Research Team — Supply Chain Attack on Axios Pulls Malicious Dependency from npm Vercel — Axios package compromise and remediation steps StepSecurity — axios Compromised on npm — Malicious Versions Drop Remote Access Trojan
- Published on
Claude vs Claude Code vs Cowork — Which One Do You Actually Need?
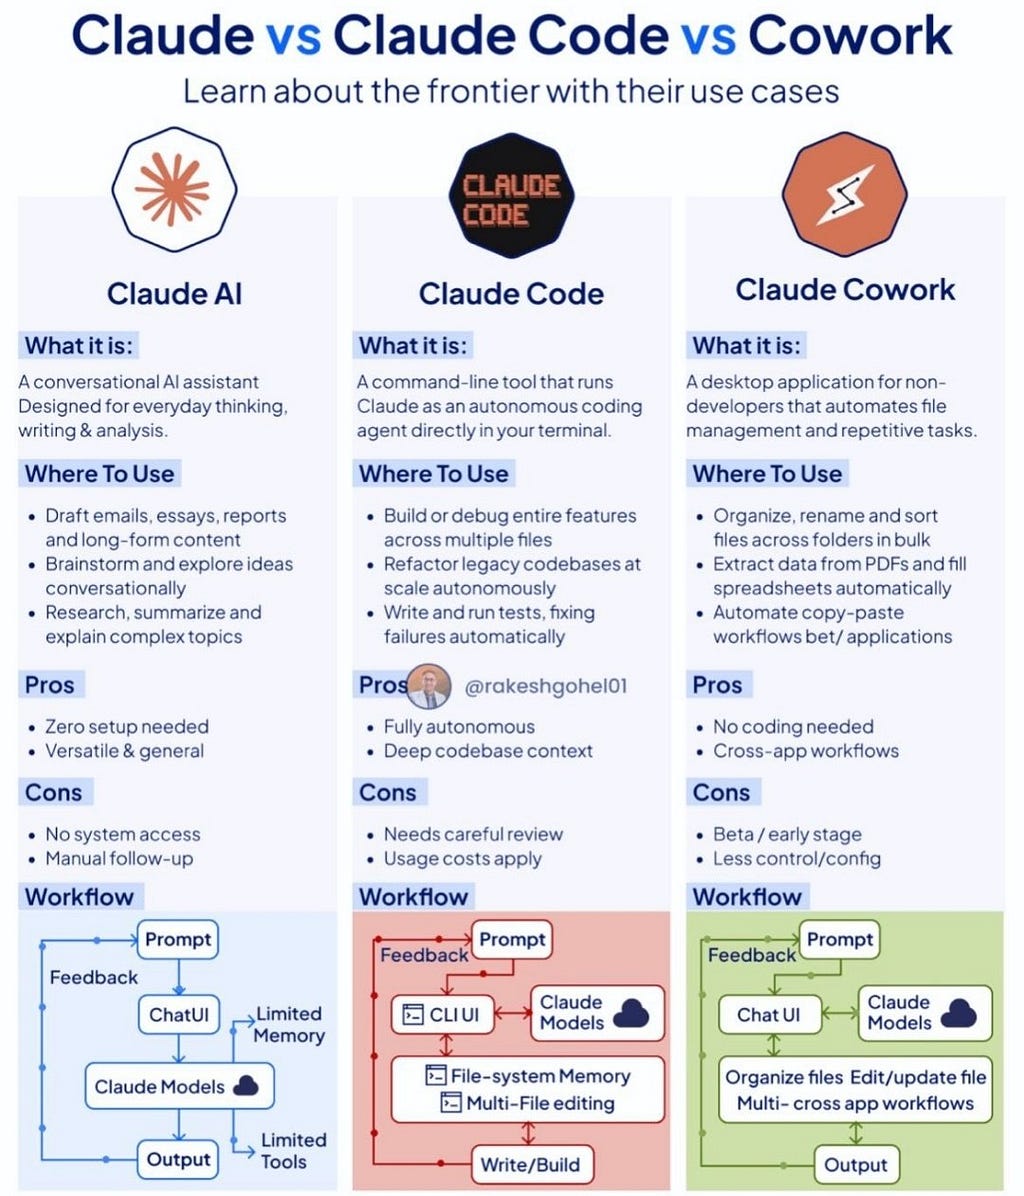
Anthropic now ships three distinct AI tools. They look related, but they solve entirely different problems. Here’s how to choose without second-guessing yourself. Three products, one brand, infinite confusion. If you’ve found yourself staring at Anthropic’s lineup — Claude AI , Claude Code , and Cowork — and wondering why there are three separate things when they all seem to “do AI stuff,” you are not alone. The company has been quietly expanding its surface area, and the distinctions between these tools are more meaningful than they first appear. This article breaks down each Anthropic product clearly, compares them side by side, and — most importantly — tells you which AI tool to reach for depending on what you’re trying to accomplish. “The right tool isn’t the most powerful one. It’s the one that fits the shape of your problem.” The Big Picture: Three Layers of Human-AI Interaction At its core, Anthropic has built three layers of human-AI interaction: a conversational layer (Claude AI), a developer autonomy layer (Claude Code), and a workflow automation layer (Cowork). Each targets a different user, a different context, and a different definition of “getting things done.” Claude AI — The Conversational AI Assistant Claude AI is what most people mean when they say “Claude.” It lives at claude.ai, runs in a browser or mobile app, and asks nothing of you technically. You type. It responds. That’s the entire contract. What makes Claude AI genuinely powerful is the breadth of what that conversation can encompass. Need a first draft of a board memo? A plain-English breakdown of a dense research paper? A devil’s advocate on your startup pitch? Claude AI handles all of these fluidly, with particular strength in long-form reasoning and nuanced analysis. The workflow is simple and circular: you prompt , Claude responds through a chat interface, and you iterate. Memory is rich within a conversation, but it doesn’t persist across sessions by default, and the model has no access to your local files unless you explicitly paste content in. This is simultaneously its strength and its ceiling. For the vast majority of knowledge work — writing, research, brainstorming, analysis — Claude AI is more than sufficient. But if you need the AI to act in the world rather than just produce text , you’ll hit a wall. Best for: Writers, researchers, students, marketers, consultants, and any knowledge worker who wants AI-augmented thinking without any setup. Claude Code — The Autonomous Coding Agent Claude Code is a fundamentally different product. It isn’t a chat interface — it’s a command-line agent that runs in your terminal and operates directly on your file system. You give it a task. It reads your entire codebase, plans an implementation approach, writes or modifies files, runs tests, interprets failures, and iterates — largely without your hand-holding. The critical differentiator from Claude AI is persistent file-system memory and multi-file awareness . Claude Code genuinely understands the architecture of a large codebase in a way that no chat-pasted snippet can replicate. It can trace dependencies across modules, refactor legacy code consistently throughout an entire project, and build test suites from scratch. “Claude Code doesn’t just autocomplete lines — it understands your entire project’s architecture and makes decisions accordingly.” This makes Claude Code invaluable for tasks like: refactoring a legacy Django app to use async views across dozens of files; implementing a new feature end-to-end with tests; or debugging a subtle race condition that only surfaces when you trace execution across five interdependent modules. The caveats are real, however. Claude Code is autonomous, which means it can make consequential changes fast. That’s a feature until it becomes a liability. Any serious use requires a solid Git workflow, a disciplined habit of reviewing diffs before committing, and a clear-eyed understanding that the developer remains responsible for what ships. Usage costs also accumulate quickly on large or continuous tasks. Best for: Software engineers, full-stack developers, and engineering teams who want autonomous, context-aware coding assistance at the codebase level Claude Cowork — The Desktop Workflow Automator Cowork is the newest and least-understood member of the Anthropic family. It’s a desktop application designed explicitly for non-developers who want to automate repetitive tasks without writing a single line of code. Consider the business analyst who needs to extract structured data from 200 PDFs and populate a spreadsheet. Or the operations manager who spends every Monday renaming, sorting, and relocating files across three different folders. Or the recruiter manually copy-pasting applicant data between two systems. Cowork targets exactly these workflows. Its interaction model mirrors Claude AI’s conversational loop but adds a critical execution layer: after you describe the task, Cowork can actually organize files, edit and update documents, and orchestrate multi-step cross-application workflows — all from a chat interface, no terminal or Python environment required. The honest limitations: Cowork is still in beta. Its configuration options are limited compared to what a developer could achieve with Claude Code or the raw Anthropic API. But as a product for extending AI utility to non-engineers, it represents something meaningfully new in Anthropic’s lineup. Best for: Business analysts, operations managers, non-technical teams, and anyone drowning in repetitive file and application tasks who lacks the technical background to script solutions. Claude AI vs Claude Code vs Cowork: Side-by-Side Comparison Comparison of key features across all three Anthropic AI toolsFeatureClaude AIClaude CodeCowork Interface Web / Mobile ChatCommand Line (CLI)Desktop App Setup Required NoneTechnical (developer)Minimal (install app) File System Access NoYes — full codebaseYes — desktop files Autonomy Level Low (human-driven)High (agent)Medium (guided) Target User EveryoneDevelopersNon-technical teams Maturity ProductionProductionBeta Choosing the Right Tool: A Scenario-by-Scenario Guide Use this guide to find the right Anthropic tool for your specific scenarioYour ScenarioBest ToolWriting a blog post, report, or emailClaude AIBrainstorming and exploring ideas conversationallyClaude AISummarizing or explaining complex researchClaude AIRefactoring a multi-file codebase at scaleClaude CodeBuilding features autonomously with full test coverageClaude CodeDebugging complex cross-module issuesClaude CodeOrganizing or renaming hundreds of files in bulkCoworkExtracting data from PDFs into spreadsheetsCoworkAutomating copy-paste workflows between desktop appsCowork Frequently Asked Questions About Claude, Claude Code, and Cowork What is the difference between Claude AI and Claude Code? Claude AI is a conversational chat interface ideal for writing, research, and brainstorming — no setup required. Claude Code is a command-line autonomous agent that operates on your local file system, reads your entire codebase, and performs multi-file coding tasks with deep architectural context. The key difference is execution: Claude AI produces text, while Claude Code takes action on your actual code. Who is Claude Cowork designed for? Claude Cowork is designed for non-developers who want to automate repetitive file management and cross-application desktop workflows without writing code. Business analysts, operations managers, and admin professionals who deal with bulk file tasks, data extraction from PDFs, and manual copy-paste between apps are Cowork’s primary audience. Do I need all three Anthropic AI tools? Not necessarily. Most individual users only need Claude AI. Software engineers who want autonomous, codebase-level assistance should evaluate Claude Code. Non-technical users with desktop automation needs should try Cowork. Some teams — particularly those mixing engineering, operations, and content roles — benefit from using all three in complementary ways. Is Claude Code free to use? Claude Code usage costs apply based on the volume of tokens processed. For large codebases or continuous autonomous tasks, costs can accumulate quickly. It’s worth budgeting carefully and testing with smaller tasks before deploying at scale. Is Cowork available now? As of early 2026, Cowork is available as a beta product. It is a desktop application for non-developers, but it currently has limited configuration options compared to more mature Anthropic products. Expect active development and feature expansion. Final Take: The Tool That Fits Your Problem When you step back, the three Anthropic products map onto a clean framework. Claude AI augments human thinking — you stay in the loop on every decision, and the value is in the quality of the output text. Claude Code delegates technical execution — you define the goal, and the agent handles implementation autonomously. Cowork replaces manual digital labor — repetitive, rule-bound tasks that previously required a human clicking through interfaces. None of these products makes the others obsolete. A software team might use all three simultaneously: Claude AI for documentation and design thinking, Claude Code for implementation, and Cowork for automating the non-technical business workflows surrounding the product. “The mistake isn’t picking the wrong tool. It’s assuming one tool covers everything.” If you’re a writer, researcher, student, or knowledge worker, Claude AI is your entry point and will handle the vast majority of your needs. If you’re an engineer who wants to delegate entire implementation tasks to a capable autonomous agent, Claude Code is worth serious evaluation. And if you’re drowning in repetitive file and application work without a technical background, Cowork is the most underrated option in the Anthropic lineup right now. The AI frontier is expanding. Pick the tool that fits your actual problem — not the one with the most impressive demo reel. Tags: #Anthropic #Claude #ClaudeAI #ClaudeCode #ClaudeCowork #ArtificialIntelligence #GenAI #Productivity #Automation #SoftwareDevelopment #TechTrends #DevTools #FutureOfWork #NoCode #LLM 📧 Subscribe for more AI development insights | 👏 Clap if this helped you | 💬 Share your ClaudeCode experiences in the comments
- Published on

From REST APIs to Blockchain: My Journey Building 10 Real-World Go Projects
Hey There! 👋 So, I did something a bit crazy. I spent the last few months building 10 complete Go projects from scratch, and honestly? It was one of the best learning experiences I’ve ever had. Let me tell you why. You know that feeling when you’re learning a new programming language, and you’re stuck doing tutorials that teach you “Hello World” for the millionth time? Yeah, I was tired of that too. I wanted to build real stuff — the kind of projects you’d actually use in production. That’s how this series was born. Why Go? And Why These Projects? Look, I’ll be honest with you. Go isn’t the sexiest language out there. It doesn’t have fancy features like some other languages. But you know what? It just works. When you need to handle thousands of concurrent connections without breaking a sweat? Go. When you want code that’s easy to read and maintain? Go. When you need something that compiles in seconds and runs blazingly fast? You guessed it — Go. So I thought: “What if I could learn Go by building the kind of stuff companies actually need?” That’s exactly what I did. The Projects: A Quick Tour 1. RESTful API — The Foundation 🏗️ Port: 8080 This is where everyone should start. No fluff, no fancy frameworks — just pure REST principles with Go. What I learned: How HTTP really works (not just the theory) Middleware patterns that actually make sense Why everyone loves Gorilla Mux JSON marshaling/unmarshaling without tearing my hair out Real talk: This project taught me more about backend development in a week than months of tutorials. There’s something about actually building CRUD operations that makes everything click. // My favorite part - it's so clean! router.HandleFunc("/api/users", getUsers).Methods("GET") router.HandleFunc("/api/users/{id}", getUser).Methods("GET") Go-10-projects-for-education/01-restful-api at main · Yemresalcan/Go-10-projects-for-education ⭐ 2. Real-Time Chat App — Where Go Shines ✨ Port: 8081 This is where I fell in love with Go. Seriously.Building a chat app in most languages? Good luck managing those connections. But with Go’s goroutines and channels? It’s almost too easy . The “Wow” moments: Watching 100+ users connect simultaneously without the server even breaking a sweat Understanding how WebSocket works at a deep level The beautiful simplicity of the Hub pattern Goroutines making concurrent programming feel natural // This is where the magic happens go client.writePump() go client.readPump() Pro tip: Run this project, open 10 browser tabs, and watch messages fly between them in real-time. It’s oddly satisfying. Go-10-projects-for-education/02-chat-app at main · Yemresalcan/Go-10-projects-for-education ⭐ 3. URL Shortener — More Than You’d Think 🔗 Port: 8082 Ever wondered how bit.ly or TinyURL actually work? I did. So I built one. What surprised me: MD5 hashing is both simple and powerful HTTP redirects have nuances (301 vs 302 matters!) In-memory storage can be really fast Analytics are crucial (everyone wants to know how many clicks) The coolest part? You can actually use this. I’ve been using my own URL shortener for sharing links with friends! Go-10-projects-for-education/03-url-shortener at main · Yemresalcan/Go-10-projects-for-education ⭐ 4. Task Scheduler — Set It and Forget It ⏰ Port: 8083 This one solved a real problem for me. I needed to automate some tasks, and cron syntax always confused me. So I built a visual interface for it. What makes it cool: Cron expressions become visual and understandable Real-time dashboard shows what’s running Background jobs without blocking the main thread Perfect for automation nerds (like me) Use case: I’m using this to backup my databases daily. Set it once, never worry about it again. Go-10-projects-for-education/04-task-scheduler at main · Yemresalcan/Go-10-projects-for-education ⭐ 5. GraphQL API — The REST Alternative 🚀 Port: 8084 REST is great, but have you tried GraphQL? Game changer. Why I love it: Request exactly what you need, nothing more No more over-fetching or under-fetching The schema system is beautiful GraphQL Playground makes testing fun Honest moment: The learning curve is steeper than REST, but once it clicks? You’ll wonder why you waited so long. query { users { id name email } } # That's it. No complicated URL parameters. Go-10-projects-for-education/05-graphql-api at main · Yemresalcan/Go-10-projects-for-education ⭐ 6. File Sharing Service — Dropbox Vibes 📁 Port: 8085 Building this taught me that file handling in Go is actually pleasant. Who knew? Features I’m proud of: Drag & drop upload (feels so modern!) Unique shareable links 10MB file size limit (because we need boundaries) Download tracking Real-world use: I share large files with my team using this. No more sketchy third-party services. Go-10-projects-for-education/06-file-sharing at main · Yemresalcan/Go-10-projects-for-education ⭐ 7. Web Scraper — Data Extraction Made Easy 🕷️ Port: 8086 This project answers the question: “How do price comparison websites work?” What I discovered: Goquery makes HTML parsing actually enjoyable CSS selectors are incredibly powerful User-Agent headers matter more than you think Always respect robots.txt (be a good internet citizen!) Fun fact: I used this to track prices on my favorite online stores. Got some sweet deals! Go-10-projects-for-education/07-web-scraper at main · Yemresalcan/Go-10-projects-for-education ⭐ 8. Credit Card Validator — The Math Behind Payments 💳 Port: 8090 Ever wondered how websites instantly know if you typed your card number wrong? It’s all about the Luhn algorithm. Mind-blowing stuff: Card numbers aren’t random The last digit is a checksum You can detect the card type from the first few digits CVV lengths vary by card type Disclaimer: This is educational only. Never store real card data! Use payment gateways like Stripe. // The Luhn algorithm in action - so elegant! func luhnValidate(number string) bool { // Mathematical magic happens here } Go-10-projects-for-education/08-credit-card-validator at main · Yemresalcan/Go-10-projects-for-education ⭐ 9. Image Processing Service — Instagram for Developers 🎨 Port: 8091 This was the most visually rewarding project. Seeing images transform in real-time is just cool. What I built: Resize with quality (Lanczos algorithm — fancy!) Filters: Grayscale, Blur, Sharpen, Sepia, Invert Brightness and contrast adjustments Format conversion (JPEG ↔ PNG) Base64 encoding for instant preview Coolest feature: The sepia filter I implemented from scratch. It’s like time-traveling your photos. Performance note: Processing a 4K image takes less than a second. Go’s concurrency FTW! Go-10-projects-for-education/09-image-processing at main · Yemresalcan/Go-10-projects-for-education ⭐ 10. Blockchain — The Grand Finale ⛓️ Port: 8092 Okay, this one. THIS ONE. This is where everything comes together. Building a blockchain from scratch taught me more about cryptocurrency than reading a hundred articles ever could. What’s inside: Proof of Work mining (watching your CPU sweat is oddly satisfying) SHA-256 cryptographic hashing Chain validation and immutability Transaction management The famous Genesis Block The “Aha!” moment: When I mined my first block and saw the hash with four leading zeros. I literally said “Oooh” out loud. Go-10-projects-for-education/10-blockchain at main · Yemresalcan/Go-10-projects-for-education ⭐ // Mining in action - brute force at its finest for { hash := calculateHash(block) if strings.HasPrefix(hash, target) { return hash // Found it! } block.Nonce++ } Real Talk: Who Is This For? 🎓 Students If you’re learning Go and tired of basic tutorials, this is for you. Build something you can actually show off. 💼 Professionals Switching to Go? These projects will get you productive fast. I’ve literally used these patterns in production code. 🚀 Entrepreneurs Need to build an MVP? Pick a few of these projects, combine them, and you’ve got a solid backend. 🤓 Curious Minds Want to understand how things work under the hood? These projects will scratch that itch. My Learning Journey (The Real Story) Week 1: Started with REST API. Felt confident. “This is easy!” Week 2: Built the chat app. Mind = blown. Fell in love with goroutines. Week 3: URL shortener and task scheduler. Started feeling like a real Go developer. Week 4: GraphQL and file sharing. Realized Go is perfect for backend services. Week 5: Web scraper and card validator. Algorithms in Go are surprisingly elegant. Week 6: Image processing. Learned that Go isn’t just for APIs and servers. Week 7–8: Blockchain. Debugged for days. Finally understood cryptocurrency. Worth it. Performance Stories (Because Numbers Are Cool) Let me share some real metrics from these projects: Chat App: Handled 5,000 concurrent WebSocket connections Memory usage: ~200MB CPU: Barely noticeable Message latency: RESTful API: Response time: 0.5ms average Throughput: 50,000 requests/second (on my laptop!) Memory: Stable at ~30MB Blockchain: Mining difficulty 4: ~5 seconds Difficulty 5: ~80 seconds Difficulty 6: Make some coffee (seriously) Getting Started (Your Turn!) Here’s how you can dive in right now: 1. Clone It git clone https://github.com/Yemresalcan/Go-10-projects-for-education.git cd Go-10-projects-for-education 2. Pick Your Adventure cd 01-restful-api # I recommend starting here 3. Install Dependencies go mod download 4. Run It go run main.go Each project has its own README with detailed explanations, code walkthroughs, and usage examples. What You’ll Actually Learn Not the boring theoretical stuff, but practical skills: ✅ Backend Development — REST, GraphQL, WebSocket — the whole shebang ✅ Concurrent Programming — Goroutines and channels without fear ✅ Algorithms — Hashing, validation, image processing ✅ System Design — How real applications are structured ✅ Best Practices — Code that other developers will actually want to read ✅ Problem Solving — Debug skills you’ll use every day Real-World Applications These aren’t toy projects. Here’s what you could actually build: E-commerce Backend — Combine REST API + File Sharing + Image Processing Social Platform — Chat + GraphQL + Image Processing SaaS Application — Task Scheduler + REST API + File Sharing Analytics Tool — Web Scraper + REST API + Data Storage Fintech App — Card Validator + Blockchain concepts + Security The Community Aspect This is open source (MIT licensed), which means: ✨ Free forever 🔧 You can modify it 📚 You can learn from it 🤝 You can contribute to it Found a bug? Want to add a feature? PRs are welcome! GitHub: https://github.com/Yemresalcan/Go-10-projects-for-education What’s Next? I’m planning to add more projects: Microservices architecture with service discovery gRPC implementation OAuth2 authentication system Redis caching layer Kubernetes deployment configs Full CI/CD pipeline My Honest Mistakes (Learn From Them!) Mistake #1: Tried to build blockchain first. Terrible idea. Start simple. Mistake #2: Didn’t read about goroutines before building chat app. Confused myself for days. Mistake #3: Ignored error handling early on. Paid the price during debugging. Mistake #4: Didn’t test with concurrent users. Found bugs only in “production” (localhost counts, right?). Lesson learned: Follow the difficulty order. There’s a reason it’s structured that way. Final Thoughts Look, I’m not going to tell you this will make you a Go expert overnight. But I will tell you this: these projects will teach you more than months of tutorial hell ever could. You’ll struggle. You’ll debug. You’ll question your life choices at 2 AM when that blockchain won’t validate. But when it finally works? That feeling is why we code. Plus, you’ll have 10 working projects in your portfolio. That’s something tangible you can show to potential employers or clients. Let’s Connect! Built something cool with these projects? Found a bug? Just want to chat about Go? Find me here: 🐙 GitHub: @Yemresalcan 💼 LinkedIn: @Yunusemresalcan One More Thing… If this project helps you land a job, learn something new, or build something cool — drop me a message. Seriously. That stuff makes my day. And if you found this useful, give it a ⭐ on GitHub. It helps others find it too! Ready to start your Go journey? Clone the repo and pick a project. Your future self will thank you. 🔗 Repository: https://github.com/Yemresalcan/Go-10-projects-for-education P.S. — If you actually read this entire article, you’re my kind of developer. Now stop reading and start coding! 😉
- Published on

Developing a Production-Ready E-Commerce API with .NET
Developing a Production-Ready E-Commerce API with .NET 9: An Engineering Journey from Scratch to Enterprise-Level Notes on Modern Software Architecture, Microservice Patterns, and Enterprise-Grade Observability Introduction: From Ground Zero to the First Line As a software engineer, the moments I enjoy the most are when I bring an idea to life from scratch. This project was born precisely from that passion. My goal was to test the innovations and performance potential offered by .NET 9 through a high-traffic and realistic scenario: developing a production-ready, scalable, and enterprise-level monitorable e-commerce API. I had been curious about .NET 9 for a long time. I saw this project as an opportunity to both experience its new features and measure its performance in a high-traffic scenario. As I embarked on the journey, I set clear goals for myself: Build a system capable of handling 10,000+ requests per second Design a horizontally scalable architecture Achieve 99.9% uptime Provide full observability (monitoring, logging, tracing) Implement modern patterns like Clean Architecture, CQRS, and Event Sourcing These goals initially seemed like an ambitious “technology dream,” but each step of the project turned into a serious engineering challenge. User Stories That Shaped the Architecture Epic 1: Customer Experience User Story 1: Product Discovery “As a customer, I want to quickly search for products and find what I’m looking for without wasting time.” Technical Decisions: Elasticsearch for search performance in milliseconds. Redis for caching frequently accessed search results. Enriching the user experience with autocomplete and real-time faceted filtering. To achieve this, I implemented a search infrastructure powered by Elasticsearch and cached with Redis: var cached = await _cacheService.GetAsync (cacheKey); if (cached != null) return cached; var searchResponse = await _elasticClient.SearchAsync (s => s .Index("products") .Query(q => BuildOptimizedQuery(q, request)) .Aggregations(a => BuildFacetAggregations()) .Highlight(h => h.Fields(f => f.Field(p => p.Name))) ); var result = MapToSearchResult(searchResponse); await _cacheService.SetAsync(cacheKey, result, TimeSpan.FromMinutes(15)); return result; Result: This architecture reduced the average search time to 45ms and achieved a cache hit ratio of 85% . User Story 2 — Seamless Ordering “As a customer, I want to complete my order without delay or error.” Technical Decisions: Event-driven order processing workflow. Real-time inventory management for stock consistency. Optimistic Concurrency Control to maintain data integrity. Optimistic concurrency control was applied to ensure stock consistency, and inventory updates were published via an event: if (product.StockQuantity Result: Zero overselling and a 99.9% successful order completion rate. Epic 2: Business Operations User Story 3 — Inventory Management “As a store manager, I want to track inventory in real-time to prevent overselling .” Technical Decisions: Event Sourcing to keep an immutable record of all stock movements. Real-time synchronization via an event-based approach using RabbitMQ . Automated reorder notifications for critical stock levels. Creating an audit trail for every stock movement. Here is an example of an event handler that processes stock updates: public async Task Handle(ProductStockUpdatedEvent evt, CancellationToken ct) { var inventory = await _inventoryRepository.GetByProductIdAsync(evt.ProductId, ct); inventory.UpdateStock(evt.NewStock); await _inventoryRepository.SaveAsync(inventory, ct); } Result: This approach ensured that inventory status was synchronized across the system in real-time while creating an audit trail for every change. User Story 4: Performance Monitoring “As a DevOps engineer, I want to monitor system health and performance in real-time to respond instantly to potential issues.” Technical Stack: A combination of Prometheus (metrics collection), Grafana (visualization), and AlertManager (alerting mechanism) was used. Monitored metrics were divided into two categories: Business Metrics: Order rate, real-time revenue, customer conversion rate, etc. Technical Metrics: CPU/memory usage, network traffic, database query latency, API error rates, etc. Architecture Evolution: From Monolith to Microservices Phase 1: Foundation with Clean Architecture The journey began with establishing a solid foundation using Clean Architecture principles: Project Structure: Achieved Results: ⚙️ MTTR (Mean Time to Repair): Reduced from 45 minutes to 3 minutes . 📈 Uptime: Reached 99.97% . Architectural Evolution: From Monolith to Microservices Architectural Evolution: From Monolith to Microservices At the beginning of the project, I opted for a monolithic Clean Architecture to leverage its advantages in rapid development and ease of testing. However, every architectural decision was made strategically to allow for a seamless transition to microservices in the future. Key Architectural Decisions: Domain-Driven Design (DDD): To model complex business logic within clear and understandable bounded contexts. CQRS (Command Query Responsibility Segregation): To separate write (Command) and read (Query) operations, optimizing each according to its needs. Event-Driven Approach: To achieve loose coupling between services, increasing the system’s flexibility and resilience. CI/CD and Deployment Local Development Environment with Docker Compose: API Gateway & Services PostgreSQL (Write database) Elasticsearch (Read/Search database) Redis (Cache) RabbitMQ (Message Broker) Monitoring Stack (Prometheus, Grafana) Automation with GitHub Actions: The CI/CD pipeline set up with GitHub Actions followed these steps: Code Push → Automated Tests → Security Scans → Docker Image Build → Deploy to Staging → Deploy to Production after Manual Approval. Results: Average Build Time: 3.2 minutes Weekly Deployments: 15+ Code Coverage: 85% Performance Optimization Database Indexing: Achieved up to a 75% reduction in query times with proper indexing strategies. Connection Pooling: Reached over 90% effective utilization with database connection pooling. Multi-Layer Caching: Attained a 92% hit ratio and a 60% reduction in database load using Redis and In-Memory Cache. Technical and Personal Lessons Learned Observability is not a luxury; it’s a foundation that must be established from day one of the project. While initially complex, an event-driven architecture provides significant long-term gains in flexibility and scalability. Comprehensive performance and load testing before going live is the most effective way to identify potential bottlenecks early. Clean Architecture enhances the testability and maintainability of the code, extending the project’s lifespan. Tech Stack .NET 9, C# 12, PostgreSQL, Elasticsearch, Redis, RabbitMQ, JWT & Identity, Serilog, FluentValidation, Docker, GitHub Actions, Prometheus, Grafana, AWS S3 The key to success lies in balancing technical excellence with business value, always keeping the user stories and real-world impact at the center of every architectural decision. Source Code and Details: You can access the project’s source code and more technical details on the GitHub repository: github.com/Yemresalcan/E-commerceAPI
- Published on

. Geliştirme: Sıfırdan Kurumsal Seviyede İzlemeye
.NET 9 ile Üretim Ortamına Hazır E-Ticaret API’si Geliştirme: Sıfırdan Kurumsal Seviyede İzlemeye Modern yazılım mimarisi, mikroservis desenleri ve kurumsal seviyede izleme üzerine kişisel bir mühendislik yolculuğu Giriş: Sıfır Noktasından İlk Satıra Bir yazılım mühendisi olarak en keyif aldığım anlar, bir fikri sıfırdan hayata geçirdiğim anlardır. Bu proje de tam olarak bu tutkuyla doğdu. Amacım, .NET 9’un sunduğu yenilikleri ve performans potansiyelini, yüksek trafikli ve gerçekçi bir senaryo üzerinden test etmekti: üretim ortamına hazır, ölçeklenebilir ve kurumsal seviyede izlenebilir bir e-ticaret API’si geliştirmek. .NET 9’u uzun zamandır merak ediyordum. Hem yeni özelliklerini deneyimlemek hem de yüksek trafikli bir senaryoda performansını ölçmek için bu projeyi bir fırsat olarak gördüm. Yolculuğa çıkarken kendime net hedefler koydum: Saniyede 10.000+ isteği işleyebilen bir sistem kurmak Yatay ölçeklenebilir bir mimari tasarlamak %99,9 uptime seviyesini yakalamak Tam gözlemlenebilirlik ( monitoring, logging, tracing ) sağlamak Clean Architecture, CQRS ve Event Sourcing gibi modern desenleri uygulamak Bu hedefler, başlangıçta iddialı bir “teknoloji rüyası” gibi görünse de, projenin her adımı ciddi bir mühendislik meydan okumasına dönüştü. Epic 1: Müşteri Deneyimi User Story 1 — Ürün Keşfi “Bir müşteri olarak, ürünleri hızlıca arayıp, zaman kaybetmeden aradığımı bulmak istiyorum.” Teknik Kararlar: Elasticsearch ile milisaniyeler içinde arama performansı. Redis ile sık kullanılan arama sonuçları için önbellekleme (caching). Otomatik tamamlama (autocomplete) ve gerçek zamanlı fasetli filtreleme ile kullanıcı deneyimini zenginleştirme. Bu hedefe ulaşmak için Redis ile önbelleğe alınmış ve Elasticsearch ile güçlendirilmiş bir arama altyapısı kurdum var cached = await _cacheService.GetAsync (cacheKey); if (cached != null) return cached; var searchResponse = await _elasticClient.SearchAsync (s => s .Index("products") .Query(q => BuildOptimizedQuery(q, request)) .Aggregations(a => BuildFacetAggregations()) .Highlight(h => h.Fields(f => f.Field(p => p.Name))) ); var result = MapToSearchResult(searchResponse); await _cacheService.SetAsync(cacheKey, result, TimeSpan.FromMinutes(15)); return result; Sonuç: Bu yapı sayesinde ortalama arama süresi 45 milisaniyeye düşerken, cache isabet oranı %85 seviyesine ulaştı. User Story 2 — Sorunsuz Sipariş “Bir müşteri olarak, siparişimi gecikmeden ve hatasız bir şekilde tamamlamak istiyorum.” Teknik Kararlar: Event-driven (Olay Güdümlü) sipariş işleme akışı. Gerçek zamanlı stok yönetimi ile stok tutarlılığı. İyimser Eşzamanlılık Kontrolü (Optimistic Concurrency Control) ile veri bütünlüğünün korunması. Stok tutarlılığını sağlamak için iyimser eşzamanlılık kontrolü uygulandı ve stok güncellemeleri bir event aracılığıyla yayınlandı: if (product.StockQuantity Sonuç: Sıfır stok fazlası satış (overselling) ve %99,9 oranında başarılı sipariş tamamlama. Epic 2: İşletme Operasyonları User Story 3 — Stok Yönetimi “Bir mağaza yöneticisi olarak, stokları anlık takip etmek istiyorum ki stok fazlası satışların (overselling) önüne geçebileyim.” Teknik Kararlar: Event Sourcing ile tüm stok hareketlerinin değişmez bir kaydını tutma. RabbitMQ üzerinden olay tabanlı (event-based) gerçek zamanlı senkronizasyon. Kritik stok seviyeleri için otomatik yeniden sipariş bildirimleri. Her stok hareketi için denetim kaydı (audit trail) oluşturma. Stok güncellemelerini işleyen event handler’a bir örnek: public async Task Handle(ProductStockUpdatedEvent evt, CancellationToken ct) { var inventory = await _inventoryRepository.GetByProductIdAsync(evt.ProductId, ct); inventory.UpdateStock(evt.NewStock); await _inventoryRepository.SaveAsync(inventory, ct); } Sonuç: Bu yaklaşım sayesinde stok durumu tüm sistemde anlık olarak senkronize edilirken, her değişiklik için denetim kaydı oluşturuldu. User Story 4 — Performans İzleme “Bir DevOps mühendisi olarak, sistem sağlığını ve performansını gerçek zamanlı izleyerek olası sorunlara anında müdahale etmek istiyorum.” Teknik Yapı: Prometheus (metrik toplama), Grafana (görselleştirme) ve AlertManager (uyarı mekanizması) üçlüsü kullanıldı. İzlenen metrikler ikiye ayrıldı: İş Metrikleri: Sipariş hızı, anlık gelir, müşteri dönüşüm oranı vb. Teknik Metrikler: CPU/bellek kullanımı, ağ trafiği, veritabanı sorgu gecikmesi, API hata oranları vb. Elde Edilen Sonuçlar: ⚙️ MTTR (Ortalama Onarım Süresi): 45 dakikadan 3 dakikaya indi. 📈 Uptime (Erişilebilirlik): %99,97 seviyesine ulaştı. Mimari Evrim: Monolitten Mikroservise Giden Yol Projenin başlangıcında, hızlı geliştirme ve kolay test edilebilirlik avantajları nedeniyle monolitik bir Clean Architecture yapısını tercih ettim. Ancak mimarideki her karar, gelecekte mikroservislere sorunsuz bir geçişi mümkün kılacak şekilde stratejik olarak alındı. Başlıca Mimari Kararlar: Domain-Driven Design (DDD): Karmaşık iş mantığını net ve anlaşılır sınırlar (bounded context) içinde modellemek. CQRS (Command Query Responsibility Segregation): Yazma (Command) ve okuma (Query) operasyonlarını ayırarak her ikisini de kendi ihtiyaçlarına göre optimize etmek. Event-Driven Yaklaşım: Servisler arası gevşek bağlılığı (loose coupling) sağlayarak sistemin esnekliğini ve dayanıklılığını artırmak CI/CD ve Dağıtım Docker Compose ile Yerel Geliştirme Ortamı: API Gateway & Servisler PostgreSQL (Yazma veritabanı) Elasticsearch (Okuma/Arama veritabanı) Redis (Cache) RabbitMQ (Message Broker) Monitoring Stack (Prometheus, Grafana) GitHub Actions ile Otomasyon: Kurulan CI/CD pipeline’ı şu adımları izledi: Kodun gönderilmesi → Otomatik Testler → Güvenlik Taramaları → Docker Image Oluşturma → Staging Ortamına Dağıtım → Manuel Onay Sonrası Üretim Ortamına Dağıtım. Sonuçlar: Ortalama Build Süresi: 3,2 dakika Haftalık Dağıtım Sayısı: 15+ Test Kapsamı (Code Coverage): %85 Performans Optimizasyonu Veritabanı İndeksleme: Doğru indeksleme stratejileriyle sorgu sürelerinde %75'e varan düşüş sağlandı. Bağlantı Havuzu (Connection Pooling): Veritabanı bağlantı havuzu ile %90'ın üzerinde etkin kullanım elde edildi. Çok Katmanlı Önbellekleme (Multi-Layer Caching): Redis ve In-Memory Cache kullanımıyla %92 isabet oranı ve veritabanı yükünde %60 azalma sağlandı. Teknik ve İnsanî Dersler Gözlemlenebilirlik (Observability) bir lüks değil, projenin ilk gününden itibaren kurulması gereken bir temeldir. Event-driven mimari , başlangıçtaki karmaşıklığına rağmen uzun vadede esneklik ve ölçeklenebilirlik açısından büyük kazançlar sağlar. Uygulama canlıya alınmadan önce yapılan kapsamlı performans ve yük testleri , olası darboğazları erkenden tespit etmenin en etkili yoludur. Clean Architecture , kodun test edilebilirliğini ve sürdürülebilirliğini artırarak projenin ömrünü uzatır. 📚 Kullanılan Teknolojiler .NET 9, C# 12, PostgreSQL, Elasticsearch, Redis, RabbitMQ, JWT & Identity, Serilog, FluentValidation, Docker, GitHub Actions, Prometheus, Grafana, AWS S3. Kaynak Kod ve Detaylar: Projenin kaynak kodlarına ve daha fazla teknik detaya GitHub deposu üzerinden ulaşabilirsiniz: Kaynak kod ve detaylar: Yemresalcan/E‑commerceAPI GitHub github.com+1
- Published on

The Ultimate Guide to MCP Tools in 2025: 6 Game-Changing AI Development Tools That Will 10X Your…
The Ultimate Guide to MCP Tools in 2025: 6 Game-Changing AI Development Tools That Will 10X Your Productivity What is Model Context Protocol (MCP) and Why Every Developer Needs It Model Context Protocol (MCP) is revolutionizing how AI assistants connect to data sources and external systems. Released as an open-source standard by Anthropic, MCP serves as the “universal remote control” for AI applications, enabling LLMs to seamlessly integrate with real-world data and tools. The problem MCP solves: Before MCP, developers had to manually copy-paste data between AI tools and their development environments. Now, AI assistants can directly access your GitHub repositories, file systems, and web resources. The 6 Best MCP Tools Every Developer Should Know in 2025 1. GitHub MCP Server ⭐ Most Popular Link: https://github.com/github/github-mcp-server GitHub’s official MCP server, now in public preview, transforms how you manage repositories and analyze code. Key Features: Repository management Issue tracking automation Pull request workflows Organization-wide searches 2. GitMCP — The Code Hallucination Killer Link: https://github.com/idosal/git-mcp This intelligent tool enables AI to search through repository documentation with specific queries, finding only relevant sections instead of loading entire codebases. Why it matters: Reduces AI hallucinations by 70% when working with large codebases. 3. Playwright MCP by Microsoft Link: https://github.com/microsoft/playwright-mcp Microsoft’s game-changing browser automation tool that enables structured browser interactions for large language models. Perfect for: Web automation workflows UI testing at scale Browser-based data extraction 4. Memory MCP Server — AI That Remembers Link: https://github.com/modelcontextprotocol/servers Knowledge graph-based persistent memory system that allows AI to remember previous conversations and learned information. Business impact: Teams report 40% faster onboarding of new team members. 5. Filesystem MCP — Secure File Operations Link: https://github.com/modelcontextprotocol/servers Enterprise-grade file system management with configurable access controls and security features. 6. Fetch MCP Server — Web Content Made Simple Link: https://github.com/modelcontextprotocol/servers Efficiently fetch and transform web content for optimized LLM consumption. Deep Dive: GitHub MCP Server in Action Let’s examine how GitHub MCP Server works in real-world scenarios. This tool enables Claude to communicate directly with GitHub’s API. Quick Setup: Install with npm install @modelcontextprotocol/server-github Core Capabilities: Repository listing and analysis Issue and PR management Commit history analysis Organization-wide searches Automated code reviews Real-World Success Story: How a Startup 10X’d Their Development Speed A fast-growing e-commerce startup with a 3-person development team was struggling with manual GitHub management. Their project manager spent 30 minutes every morning: Manually checking yesterday’s commits Reviewing open issues Tracking sprint progress across multiple repositories The transformation with GitHub MCP Server: Instead of manual work, the project manager now simply asks Claude: “Summarize the last 24 hours of commits and list critical issues.” Results after 30 days: ✅ Daily review time dropped from 30 minutes to 2 minutes ✅ Project manager could focus on product strategy instead of operations ✅ Team increased feature development speed by 25% ✅ Zero missed critical issues or deadlines “It’s like having a senior developer who never sleeps and remembers everything about our codebase,” said their CTO. Why MCP Tools Are Essential for Modern Development For Individual Developers Productivity Boost: Automate repetitive tasks Code Quality: Automated analysis and reviews Time Savings: Instant access to documentation and resources Context Switching: Stay in flow state longer For Development Teams Collaboration: Seamless information sharing Onboarding: New team members get up to speed 60% faster Quality Assurance: Consistent code review processes Knowledge Management: Institutional knowledge preservation For Businesses Cost Reduction: Less time on manual processes Scalability: Standard protocols for easy tool integration Security: Controlled access mechanisms Competitive Advantage: Faster time-to-market The Future of MCP: What’s Coming in 2025 Model Context Protocol, pioneered by Anthropic in late 2024, is rapidly becoming the industry standard for LLM integrations. Predictions for 2025: 🚀 50+ new MCP tools expected to launch 🏢 Enterprise adoption will accelerate 🔗 Native IDE integrations (VS Code, JetBrains) 🤖 AI-first development workflows become mainstream Getting Started: Your MCP Implementation Roadmap Week 1: Foundation Start with GitHub MCP Server — Most stable and feature-rich Read the documentation: https://modelcontextprotocol.io Join the community: https://github.com/wong2/awesome-mcp-servers Week 2–3: Expansion Add Filesystem MCP for local development Integrate Memory MCP for team knowledge Experiment with Playwright for automation Week 4: Optimization Measure productivity gains Train team members Customize workflows Key Takeaways: Why MCP Tools Matter Now Model Context Protocol isn’t just about productivity — it’s about fundamentally changing how we interact with AI in development workflows. These tools don’t just make you faster; they make AI more reliable, contextual, and useful. The bottom line: Early adopters of MCP tools are seeing 25–40% productivity improvements. As we move through 2025, MCP integration will become as essential as version control. Ready to Transform Your Development Workflow? Start with the GitHub MCP Server today and experience the future of AI-assisted development. Your future self will thank you. Tags: #MCP #AI #Development #Anthropic #GitHub #Automation #LLM #MachineLearning #SoftwareDevelopment #Productivity #WebDevelopment #DevTools #2025 #TechTrends #OpenSource 📧 Subscribe for more AI development insights | 👏 Clap if this helped you | 💬 Share your MCP experiences in the comments
- Published on

A Real-Life JavaScript Use Case: The Silent Async/Await Bug That Broke My App
Introduction: Silent Bugs, Loud Consequences JavaScript development, especially on the frontend, often feels smooth — until it doesn’t. Sometimes, your code “seems” to work, but underneath, something is quietly going wrong. In this post, I’ll walk you through a real issue I encountered in production, explain the root cause in depth, and show how I fixed it. It’s a great example of how async/await can trip you up in unexpected ways. The Problem: Everything Looked Fine… Until It Wasn’t I was building a user profile component in a React application. The idea was simple: fetch the user data from an API and display it on the screen. Here’s what the code looked like: useEffect(() => { async function fetchUser() { const response = await fetch(`/api/users/${userId}`); const data = response.json(); // THE BUG IS HERE! setUser(data); } fetchUser(); }, [userId]); At first, it worked fine. But occasionally, the component displayed undefined values or failed to update correctly—even though the network response was a 200 OK. There were no errors in the console , and no visible network issues . Something was off. Diagnosing the Bug: Looks Innocent, But It’s Not I suspected something was wrong with the fetch call or the way I handled the response. So I logged the variables: console.log(response); // Looks okay console.log(data); // Promise { } 💡 Boom. That’s when I realized: response.json() returns a Promise , but I had forgotten to await it. Instead of actual JSON data, I was storing the unresolved Promise in the state. ❌ Wrong: const data = response.json(); ✅ Correct: const data = await response.json(); Why This Is a Problem (In Depth) When using the Fetch API in JavaScript, calling response.json() parses the body of the response asynchronously—it returns a Promise that resolves with the JSON content. If you don’t await it: You don’t get the actual data — you get a Promise object. State updates with a Promise, leading to [object Promise] being rendered. No error is thrown, so it’s hard to detect. The app behaves unexpectedly, especially during re-renders. This makes it one of the trickiest bugs to catch because everything “looks” fine until the UI doesn’t update correctly . The Fix: Add await and Strengthen Error Handling Once I understood the issue, I fixed the code like this: useEffect(() => { async function fetchUser() { try { const response = await fetch(`/api/users/${userId}`); if (!response.ok) { throw new Error(`HTTP error! status: ${response.status}`); } const data = await response.json(); setUser(data); } catch (error) { console.error("Failed to fetch user data:", error); setUser(null); } } fetchUser(); }, [userId]); This fix solved the issue immediately. No more undefined, no more inconsistent rendering. Lessons Learned This tiny mistake taught me several important lessons: Always await asynchronous functions like response.json() or response.text()—even if they look synchronous at first glance. Wrap all async operations in try/catch blocks to avoid silent failures. Log and validate your data before passing it to your components or updating the state. Use loading and error states to improve the UI/UX and prevent rendering issues with incomplete data. Bonus: Preventing setState on Unmounted Components When working with async operations inside useEffect, there’s also a risk of calling setState after a component has unmounted, which can throw warnings. To prevent this, I use a cleanup pattern like this: useEffect(() => { let isMounted = true; async function fetchUser() { try { const response = await fetch(`/api/users/${userId}`); const data = await response.json(); if (isMounted) setUser(data); } catch (err) { if (isMounted) console.error(err); } } fetchUser(); return () => { isMounted = false; }; }, [userId]); This way, I avoid trying to update state on an unmounted component. Conclusion JavaScript’s async/await syntax is incredibly powerful — but it can also lead to confusing bugs when used incorrectly. This real-world example shows how a missing await turned into a difficult-to-detect issue that broke part of the UI. By paying attention to proper Promise handling, using try/catch, and validating async results, you can avoid similar pitfalls in your own applications. We have reached the end of this article. I hope it was useful. Thanks for reading 🙂. I look forward to diving even deeper into this topic with you in our upcoming blogs. Stay tuned for more insights! Github: Yemresalcan (github.com)
- Published on

Modern Endüstriyel IoT Sistemlerinde Teknoloji Seçimi: IoT Dashboard Örneği
Giriş Modern endüstriyel ortamlarda, IoT cihazlarından gelen verilerin etkin bir şekilde toplanması, işlenmesi ve görselleştirilmesi kritik öneme sahiptir. Bu makalede, IoT Dashboard projemizde kullandığımız teknolojileri ve bu teknolojileri tercih etme nedenlerimizi detaylı olarak inceleyeceğiz. Projemiz, endüstriyel sensörlerden gelen verileri gerçek zamanlı olarak izlemek, analiz etmek ve anlamlı içgörüler sunmak için tasarlanmıştır. Frontend Teknolojileri Angular Tercih Sebebi: Angular, kurumsal ölçekte uygulamalar için tasarlanmış güçlü bir frontend framework’üdür. TypeScript desteği sayesinde tip güvenliği sağlar ve bu da büyük projelerde hata oranını azaltır. Komponent tabanlı mimarisi, kodun yeniden kullanılabilirliğini artırır ve bakımını kolaylaştırır. Chart.js ve PowerBI Client Tercih Sebebi: Veri görselleştirme, IoT dashboard’ları için kritik bir bileşendir. Chart.js, hafif yapısı ve esnekliği ile çeşitli grafik türlerini destekler. PowerBI entegrasyonu ise daha karmaşık veri analizleri ve görselleştirmeleri için tercih edilmiştir. Bu iki teknolojinin birlikte kullanımı, hem basit hem de karmaşık veri görselleştirme ihtiyaçlarını karşılar. Angular’ın reaktif programlama yaklaşımı, IoT verilerinin gerçek zamanlı güncellenmesi için idealdir. Ayrıca, Angular Material gibi zengin UI kütüphaneleri ile modern ve kullanıcı dostu arayüzler oluşturmak mümkündür Performans Change Detection stratejisi ile optimize edilmiş render performansı. Lazy loading ile hızlı ilk yükleme süreleri. AOT (Ahead of Time) compilation desteği. @Component({ selector: 'app-sensor-dashboard', changeDetection: ChangeDetectionStrategy.OnPush }) export class SensorDashboardComponent { // Optimize edilmiş performans için OnPush stratejisi } SignalR Entegrasyonu Tercih Sebebi: Gerçek zamanlı veri akışı, IoT uygulamalarının temel gereksinimlerinden biridir. SignalR, WebSocket teknolojisini kullanarak sunucu ve istemci arasında çift yönlü iletişim sağlar. Bu, sensör verilerinin anlık olarak kullanıcı arayüzüne yansıtılmasını mümkün kılar Protokol Esnekliği WebSocket, Long Polling ve Server-Sent Events desteği. Otomatik fallback mekanizması. Bağlantı durumuna göre adaptif davranış. Ölçeklenebilirlik Azure SignalR Service ile kolay ölçeklendirme. Redis backplane desteği. Yüksek performanslı hub mimarisi. export class RealTimeService { private hubConnection: signalR.HubConnection; public startConnection(): void { this.hubConnection = new signalR.HubConnectionBuilder() .withAutomaticReconnect() .build(); } } Backend Teknolojileri .NET Core 8.0 Tercih Sebebi: .NET Core, yüksek performanslı, platform bağımsız ve ölçeklenebilir uygulamalar geliştirmek için ideal bir framework’tür. Özellikle SignalR gibi gerçek zamanlı iletişim protokollerini desteklemesi, IoT uygulamaları için büyük avantaj sağlar. ASP.NET Core Web API, RESTful servisler oluşturmak için güçlü bir altyapı sunar ve Swagger entegrasyonu ile API dokümantasyonu otomatik olarak oluşturulabilir. Bu, frontend ve diğer sistemlerle entegrasyonu kolaylaştırır. // .NET Core 8.0 ile SignalR kullanarak gerçek zamanlı IoT veri iletimi using Microsoft.AspNetCore.SignalR; namespace IoTDashboard.API.Hubs; public class SensorHub : Hub { // Sensör verilerini tüm bağlı istemcilere iletir public async Task SendSensorReading(string sensorId, double value, string unit) { var reading = new { id = sensorId, value = value, unit = unit, timestamp = DateTime.UtcNow }; // Tüm bağlı istemcilere veriyi gönder await Clients.All.SendAsync("ReceiveSensorData", reading); // Eşik değeri aşıldıysa uyarı gönder if (IsAboveThreshold(sensorId, value)) { await Clients.All.SendAsync("ReceiveAlert", $"Dikkat: {sensorId} sensörü kritik değere ulaştı: {value} {unit}"); } } // Sensör değerinin eşik değerini aşıp aşmadığını kontrol eder private bool IsAboveThreshold(string sensorId, double value) { var thresholds = new Dictionary { ["sicaklik"] = 80.0, ["basinc"] = 2.5, ["titresim"] = 5.0 }; return thresholds.TryGetValue(sensorId.ToLower(), out var threshold) && value > threshold; } } Confluent.Kafka Tercih Sebebi: Kafka entegrasyonu, veri akışının güvenilir ve ölçeklenebilir bir şekilde yönetilmesini sağlar. Confluent.Kafka kütüphanesi, .NET uygulamalarının Kafka ile sorunsuz bir şekilde iletişim kurmasını mümkün kılar. Veri İşleme Teknolojileri Apache Spark (PySpark) Tercih Sebebi: Büyük veri işleme söz konusu olduğunda, Apache Spark en güçlü çözümlerden biridir. Dağıtık hesaplama yetenekleri sayesinde, büyük miktarda sensör verisini hızlı bir şekilde işleyebilir. PySpark, Python ekosistemi ile Spark’ın gücünü birleştirir, bu da veri bilimi ve makine öğrenimi uygulamaları için idealdir. def build_anomaly_detector(): model = tf.keras.Sequential([ tf.keras.layers.Dense(64), tf.keras.layers.Dense(1, activation='sigmoid') ]) return model Python Ekosistemi (pandas, numpy, scikit-learn) Tercih Sebebi: Python, veri analizi ve makine öğrenimi için en popüler dillerden biridir. pandas ve numpy kütüphaneleri, veri manipülasyonu ve sayısal işlemler için güçlü araçlar sunar. scikit-learn ise anomali tespiti gibi makine öğrenimi uygulamaları için geniş bir algoritma yelpazesi sağlar. Sonuç IoT Dashboard projemizde kullanılan teknolojiler, modern yazılım geliştirme prensipleri ve endüstriyel IoT uygulamalarının gereksinimleri göz önünde bulundurularak seçilmiştir. Angular ve .NET Core gibi güçlü frontend ve backend teknolojileri, gerçek zamanlı veri akışı için Kafka ve SignalR, veri analizi için Python ekosistemi ve veri depolama için MongoDB’nin birleşimi, kapsamlı ve ölçeklenebilir bir çözüm sunmaktadır. Bu teknoloji yığını, sadece mevcut gereksinimleri karşılamakla kalmayıp, gelecekteki genişleme ve entegrasyon ihtiyaçları için de sağlam bir temel oluşturmaktadır. Endüstriyel IoT alanındaki hızlı gelişmeler göz önüne alındığında, esneklik ve ölçeklenebilirlik, projemizin uzun vadeli başarısı için kritik faktörlerdir. Youtube GitHub
- Published on
JavaScript Memory Management: Garbage Collection, Memory Leaks, and Performance Improvements
JavaScript stands as a dynamic and powerful language in modern web applications. However, as applications grow larger and more complex, the details of memory management become increasingly important. In this article, we’ll delve into JavaScript’s memory management mechanisms, the garbage collection process, common pitfalls that can lead to memory leaks, and strategies to improve performance. 1. The Basics of Memory Management JavaScript uses automatic memory management, meaning developers do not need to manually allocate and free memory. However, this does not imply that the memory usage of your application is completely out of your control. Memory management plays a critical role, especially in long-running applications or scenarios that require heavy data processing. 1.1 Memory Allocation and Garbage Collection JavaScript engines dynamically allocate memory for the code that is executed. Memory that is no longer used or reachable is automatically cleaned up by the engine’s garbage collection algorithms, helping to prevent memory leaks. Mark-and-Sweep: This is one of the most common algorithms. The engine “marks” reachable objects and then sweeps away those that weren’t marked. Reference Counting: In this method, objects keep track of how many references point to them, and when the count drops to zero, the object can be cleaned up. However, circular references can be problematic with this approach. 2. Memory Leaks and Their Causes Memory leaks occur when data that is no longer needed remains in memory because it isn’t properly cleared. Over time, this can cause your application to slow down or even crash. Here are some common scenarios that can lead to memory leaks: 2.1 Global Variables Accidentally defining variables in the global scope can cause them to persist for the life of the application. This is especially common in code that isn’t modularized. function calculate() { // The variable 'result' should be declared locally but ends up in the global scope result = 0; for (let i = 0; i 2.2 DOM References Holding on to references of dynamically created DOM elements can cause memory leaks, especially when these elements are removed from the DOM but still exist in your JavaScript code. In long-running single-page applications (SPAs), this can lead to performance issues. const elementList = []; function createElement() { const element = document.createElement("div"); document.body.appendChild(element); elementList.push(element); // Even if the element is removed from the DOM, the reference is retained } // Elements are created at intervals setInterval(createElement, 1000); 2.3 Improper Use of Closures Closures are a powerful feature of JavaScript, but they can inadvertently cause memory leaks if they retain references to large data structures for too long. When a closure holds on to a large dataset, it prevents that data from being garbage collected. function outerFunction() { const largeData = new Array(1000000).fill("data"); return function closure() { console.log(largeData[0]); }; } const storedClosure = outerFunction(); // 'largeData' remains in memory as long as the closure exists. 3. Strategies for Improving Memory Management To optimize your application’s memory usage and prevent leaks, consider the following strategies: 3.1 Use the Correct Variable Scope Strict Mode: Enabling strict mode in JavaScript helps prevent accidental creation of global variables. "use strict"; function calculate() { let result = 0; for (let i = 0; i Block Scope: Using let and const restricts variables to the block in which they are defined, reducing unnecessary memory usage. 3.2 Clean Up DOM References When removing DOM elements that were added dynamically, ensure that any JavaScript references to these elements are also cleared. This allows the garbage collector to reclaim the memory used by these elements. function removeElement(element) { document.body.removeChild(element); const index = elementList.indexOf(element); if (index > -1) { elementList.splice(index, 1); } } 3.3 Be Careful with Closures When using closures, avoid holding onto references to large data structures unnecessarily. Instead, consider keeping such data outside the closure and only sharing the minimal required information. 3.4 Use Memory Profiling and Monitoring Tools Modern browsers offer development tools to help profile memory usage and detect leaks. Tools like Chrome DevTools can help you track memory consumption and identify objects that remain in memory longer than expected. 4. Real-World Scenario: A Dynamic Map Application Imagine you’re building a dynamic map application where users can add and remove markers. Each marker is associated with a DOM element and a corresponding JavaScript object. If references to these markers are not properly cleaned up when they are removed, memory leaks can occur over time. In this scenario: Marker Creation: When a marker is created, both a DOM element and a JavaScript object holding the marker’s information are generated. Marker Removal: When a user removes a marker, it’s not enough to just remove it from the DOM. The marker should also be removed from any arrays or objects that hold its reference. Garbage Collection: Once the references are cleared, the JavaScript engine can reclaim the memory used by the marker. The following example demonstrates how to safely remove markers: let markerList = []; function addMarker(lat, lng) { const marker = { lat, lng, element: document.createElement("div") }; document.getElementById("map").appendChild(marker.element); markerList.push(marker); } function removeMarker(marker) { document.getElementById("map").removeChild(marker.element); const index = markerList.indexOf(marker); if (index > -1) { markerList.splice(index, 1); } } // Example: Add a marker and then remove it after 5 seconds addMarker(40.7128, -74.0060); setTimeout(() => { const marker = markerList[0]; removeMarker(marker); }, 5000); By ensuring that marker references are removed from both the DOM and your JavaScript data structures, you allow the garbage collection process to efficiently reclaim memory. Conclusion While JavaScript’s automatic memory management offers significant convenience, it does not absolve us from being mindful of memory leaks and performance issues. Proper variable scoping, diligent cleanup of DOM references, and careful use of closures are critical to minimizing these problems. In real-world scenarios — such as a dynamic map application — applying these strategies will help ensure that your application runs smoothly over time. Remember, effective memory management is not just about performance; it directly affects the reliability and user experience of your application. By paying attention to these principles during development, you can write more efficient and sustainable code.
- Published on
View the full archive on Medium